How to layer kick drums well comes down to one idea: stack two or more kick sounds on separate tracks so each one owns a different part of the frequency spectrum, a sub layer for weight, a mid layer for body, and a top layer for attack. For hip-hop, that means a kick that hits hard on the beat and still stays clear on laptop speakers, a club rig and a phone speaker. A basic stack takes about 30 to 45 minutes once you know which layer does what.
The trick most beginners miss is that layering is not about making the kick bigger. It is about giving each sample one job and then removing everything that makes it fight the others.
What You Need
You need far less than most people assume. Here is the honest list.
- Two contrasting kick samples. One punchy main kick plus one supporting layer with a different character. A sub or 808-style sample, a short click, or an organic acoustic hit all work as the second layer.
- A DAW. Ableton Live, FL Studio and Logic Pro all handle this the same way: audio tracks, then a group or bus for shared processing.
- A parametric EQ with a high-pass filter on every plugin you own has one. You will use it more than anything else.
- A compressor with a parallel or parallel-mix option, for glue and for making the transient hit harder.
- A saturator or transient shaper to add harmonic content above the fundamental so the kick survives small speakers.
- A gain utility so you can trim levels before anything hits a compressor.
- A reference track at the loudness you actually want. Guessing levels without one is the fastest route to a muddy low end.
Keep the low-pass/high-pass filter on any reverb you add in mind too. A layer with a soft attack and a long filtered tail behaves like a completely different instrument than a tight one-shot.
Step-by-Step: How to Layer Kick Drums
Step 1: Choose Complementary Kick Drums
Pick a main kick with the punch and character you want, then pick a second sound that does something the first one does not. If your main kick has a strong click and a solid sub, the second layer should be either a deeper sub, a rounder body, or a short sharp attack.
Two kicks from the same pack, tuned the same way, will cancel more than they add. Producers keep landing on the same number: two or three layers is the practical ceiling, because every extra layer takes another slice of headroom and another slice of the low end.
Step 2: Set the Main Kick’s Role
Drop the main kick on the beat and audition it with the bass and snare in place, not in solo. Set its level so it sits at the front of the low end without pushing the bass out of the way.
If it is fighting the bass, the fix is almost always a small cut around 200 to 300 Hz on the kick, not a lower fader. How it worked in solo tells you nothing here, which is why the main kick belongs in the mix from step two onward.
Step 3: Add the Supporting Kick Layer
This is where most people go wrong, so slow down. Place the second kick on the same beat and leave it there first, then move it in tiny increments: 2 to 5 milliseconds behind the main kick for a slightly thicker hit, or a couple of milliseconds ahead for a harder, more exposed transient.
Small pitch shifts work too. Dropping a sub layer a semitone or two flattens its harmonic content and stops it from fighting a tuned bassline. Just listen for the sub wobbling after the hit; that is the pitch shift going too far.
Level-match by ear first, then look at the meters. The supporting layer often sits noticeably lower than the main kick and still does its job.
Step 4: EQ the Layers for Clarity
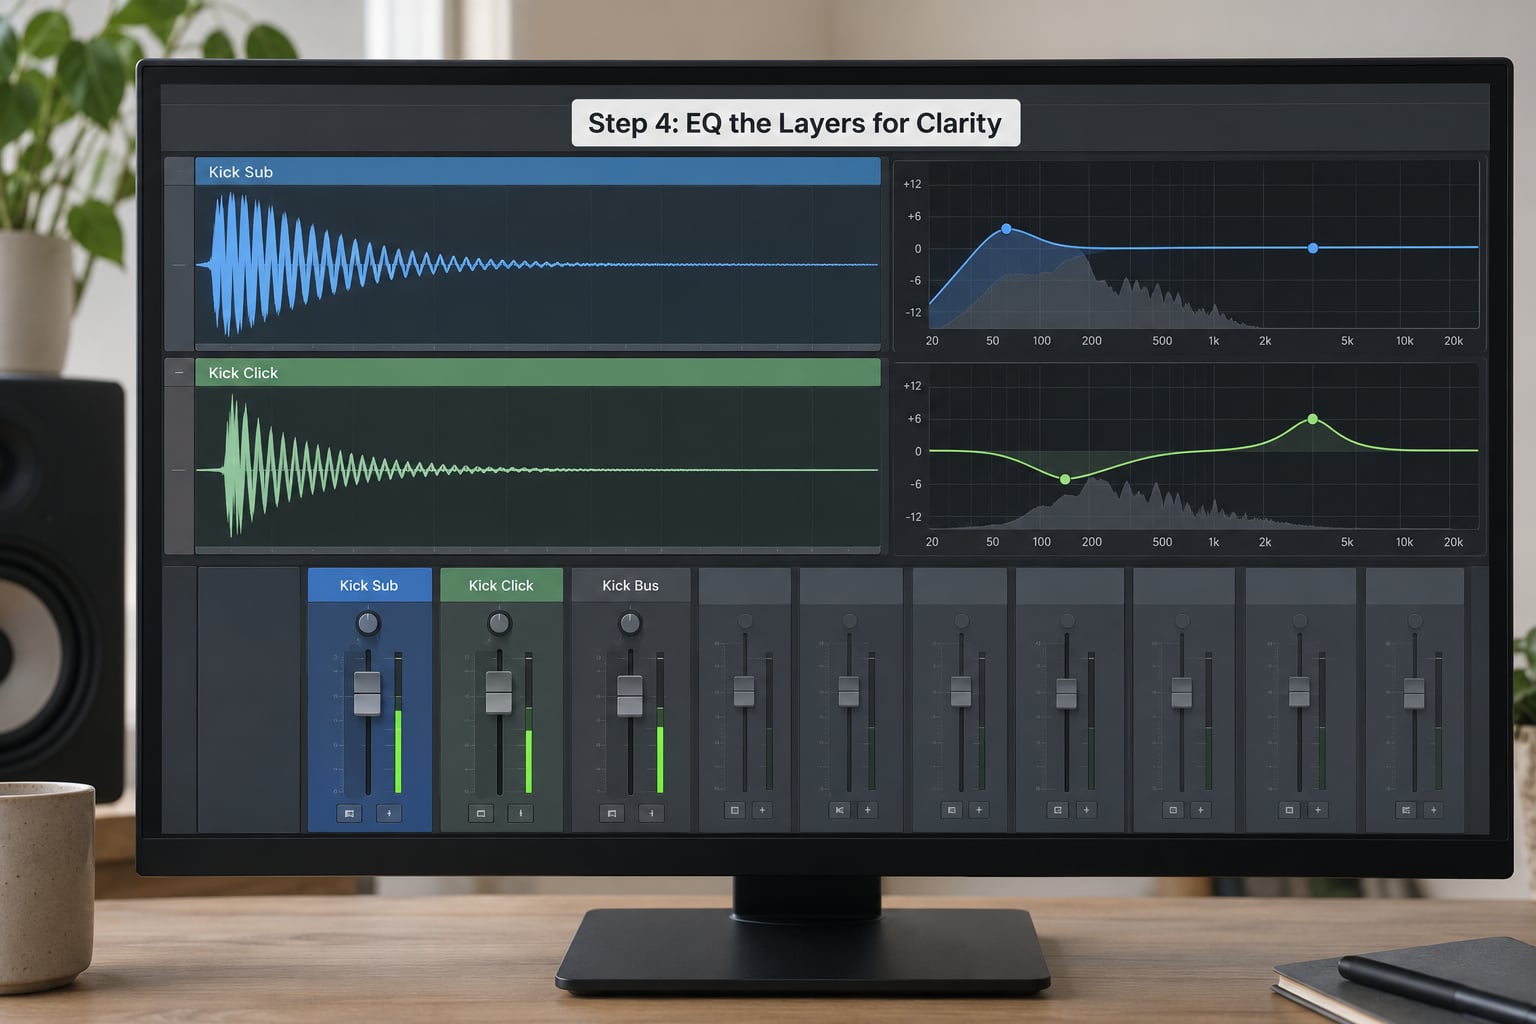
Give every layer a frequency job and cut the overlap. High-pass the top layer above whatever your sub layer is doing, then add a small cut on whichever layer owns the 200 to 400 Hz region so only one of them is loud there.
Rough starting points that work on most hip-hop material: high-pass the attack layer around 800 Hz to 1 kHz, cut a narrow dip around 200 to 300 Hz on the top layer, and put a gentle boost near 500 Hz and another between 4 and 6 kHz to bring out click and definition. These are starting values, not laws; move them by ear.
If the sub layer fights the top, high-pass every layer above your sub fundamental. Nothing else fixes it.
Step 5: Compress and Shape the Punch
Gain staging matters more than the ratio. Trim each layer down so the compressor is doing a few dB of work, not twenty, then set the attack to catch the transient and the release to let the body breathe.
Serial compression works well when you want one smooth, glued hit. Parallel compression works well when you want the kick to get louder without the squashed, choked feel: blend a heavily compressed version underneath at a low level and leave the dry transient intact.
Then add a gentle saturator to generate harmonics. A touch of saturation at the end of the chain is what makes a kick audible on a phone speaker, where the sub simply does not exist.
Step 6: Check the Layer in Context
Solo nothing. Bounce or play the full section with the bass, the snare and the hi-hats, then compare it to the reference track.
Check mono compatibility too. Most of your low end should be summed to the center, so fold the kick down to mono and listen for anything that collapses or disappears. If the sub vanishes, you have phase cancellation between layers.
Finally, level the whole stack so it survives three playback systems: headphones, nearfields, and a phone. If the kick is the only thing that changes between those three, you are done.
Common Mistakes
Using two nearly identical kicks. They occupy the same frequencies and tend to cancel. Fix: give each layer a different job before you touch a single plugin.
Boosting the same low frequencies on every layer. The low end doubles in weight and immediately turns to mud. Fix: high-pass everything above your sub fundamental.
Your stack got quieter than a single sample. This is the most common confusion on production forums. Summed waveforms partially cancel, and each added layer spends headroom. If the summed stack peaks lower than your main kick alone, push the layers up or re-check phase before you assume the layering failed.
Clicks and crackle when layering a top kick over a drum loop. Two transients land on the same millisecond. Fix: high-pass the attack layer above the loop’s existing kick frequencies, shorten its decay, and nudge its timing by 1 to 2 milliseconds.
Muddy low-mids. Every layer is carrying its own body and they sum together. Fix: cut the 200 to 400 Hz region on all but one layer.
Over-layering. Six sounds on one hit sounds thin and is harder to mix than two. Fix: count layers by frequency responsibility, not by how many samples you have.
Tuning to the key costs you punch. Pitching a sample up or down to fit the track shifts its formants and softens the attack. Fix: pitch the sub layer only, and leave the main kick alone.
One last habit worth building: audition every kick decision against the bassline in context. A kick that sounds enormous in solo can vanish completely once the bass plays the same notes.
Frequently Asked Questions
Do I need two kick drums to layer them?
No. Layering means stacking two or more sources so each one covers a different frequency range. Two contrasting samples are the practical starting point: a punchy main kick plus a sub, a short click, or an organic attack. You can also get the same result with a synth kick as the low layer and a single acoustic sample on top.
What kind of second kick works best with a punchy kick?
Something that does not duplicate the first layer. If your main kick already has click and sub, add a deeper sub or 808-style sample for weight, or a short, high-passed transient for definition. A high-passed acoustic drum or even a cowbell or hi-hat transient can supply the attack the main kick lacks. Avoid two kicks from the same pack.
Should I layer kick drums at the same time or offset them?
Start with both layers on exactly the same beat, then micro-time the top layer by 2 to 5 milliseconds. Behind the main kick gives a thicker, rounder hit; slightly ahead gives a harder, more exposed transient. Keep offsets small. Large offsets read as flam, not punch, unless that is what you want.
How do I stop layered kick drums from sounding muddy?
Give every layer one frequency job. High-pass the attack layer around 800 Hz to 1 kHz, cut a narrow dip around 200 to 300 Hz on every layer except one, and keep your sub fundamental below everything else in the stack. Then audition with the bassline playing. Muddiness is nearly always overlapping low-mids, not too much low end overall.
Should I compress a layered kick drum?
Usually yes, gently, and only after gain staging. Trim layers so the compressor does a few dB of work rather than twenty. Use serial compression for one smooth glued hit, or a parallel blend underneath for loudness without choking the transient. A light saturator after compression adds harmonics so the kick survives small speakers.
How much louder should the supporting kick layer be?
Quieter than you expect. The main kick usually sets the level and the supporting layer sits several dB below it, enough to add weight or click without turning into a second kick you have to fight. Level-match by ear first, then confirm with meters, and check the result in the full mix rather than in solo.
Conclusion
Start simple: one punchy main kick, one supporting layer with a genuinely different character, and a frequency job for each. Tune the timing with 2 to 5 milliseconds, EQ away the overlap around 200 to 300 Hz, high-pass everything above your sub, then judge the whole stack against your bassline.
That is the whole method. Everything else is taste, and taste only arrives once the layers stop fighting each other.