Time stretching changes the length of an audio sample without changing its pitch. A 2-second drum break can be made to fill four bars, or a loop can be forced to match your project tempo, all while the original key stays untouched. The names of the controls below are current as of 2026.
Most people learn this the hard way. They drag a loop, hit the stretch button, and end up with drums that sound like they were recorded through a pillow, or a vocal that sounds like a chipmunk. That is almost always a mode selection problem, not a technique problem. Pick the stretch algorithm that suits the material, tell the DAW where the beats land, and audition it at the real tempo before you export.
Table of Contents
- What You Need
- Step-by-Step: How to Time Stretch a Sample
- The workflow that works in any DAW
- How the three algorithm families behave
- Which stretch mode to pick for your material
- How to time stretch a sample in Ableton Live
- How to time stretch a sample in FL Studio
- How to time stretch a sample in Logic Pro
- MPC, Maschine, Bitwig and REAPER: the settings that matter
- Matching a sample to an exact 4-bar or 8-bar loop
- How to check the result and export it
- No DAW? Free ways to time stretch a sample
- Common Mistakes
- Stretching before the target tempo is locked
- Using pitch shift when you needed time stretch
- Stretching an MP3 or a file that was already crushed
- Trusting the detected BPM without checking it
- Raising the gain to compensate for a soft stretch
- Pushing past the usable stretch ratio
- Ignoring the transients entirely
- Leaving formant preservation on for everything
- Assuming time stretching clears the sample
- Frequently Asked Questions
- Conclusion
What You Need
The short list is small. Everything below is either free or already sitting in the DAW you own.
The essentials
- The sample itself, ideally a WAV or AIFF at 44.1 kHz or 48 kHz. Lossy files make the artifacts worse, and that is covered in the mistakes section below.
- A DAW or a capable audio editor. Ableton Live, FL Studio, Logic Pro, MPC software, Maschine, Bitwig Studio and REAPER all have a working time-stretch engine built in.
- Headphones or monitors. You need to hear artifacts that a laptop speaker hides completely, and that includes low-end loss.
Tools that help but are not required
- A transient designer or transient shaper, such as Transient Master or Transient Shaper, lets you add punch back after a stretch. You can get most of the way with stock compression instead.
- A spectrum analyzer. Voxengo SPAN, Youlean Loudness Meter and the analysers built into Logic’s Environment show you phase cancellation and level loss that your ears miss at low volume.
- A pitch-shift plugin for deliberate sound design, such as PaulStretch or a granular tool. It is a different job from tempo matching.
- A dedicated stretcher if you want more control than your DAW gives you, such as Serato Sample, Elastique or a Zynaptiq granular tool. On a single clean source, a correctly chosen stock mode usually matches them.
Elastic, spectral, granular and resampling: what the words mean
These four labels show up in almost every DAW interface, and they describe how the waveform is rebuilt rather than simply played faster or slower.
Resampling plays the original samples from the file at a different rate. Both length and pitch change together. It sounds tight on percussion and useless on anything sustained, because it is the tape-speed effect.
Spectral (phase vocoder) splits the audio into frequency and phase components, stretches the components, then rebuilds the signal. It is excellent on sustained material such as pads and strings, and it smears drum transients because it does not treat them as separate events.
Granular and overlap-add chops the audio into short grains and crossfades overlapping windows of them back together. It keeps pitch stable and can hold transients reasonably well, which is why it powers most modern modes.
Elastic audio is the marketing name Ableton uses for its granular family. Beats, Tones, Texture, Complex and Complex Pro are all elastic modes with different handling of grain size, transients and formants. When a producer says “the Ableton warp mode”, they usually mean one of those five.
Step-by-Step: How to Time Stretch a Sample
The workflow that works in any DAW
Every DAW names things differently, but the order of operations is identical. Do it in this order and you will avoid most of the problems people complain about.
- Set and lock your project tempo first. Decide the BPM before you touch the sample. A stretch ratio calculated against a tempo you then change is wasted work.
- Drop the sample in and audition it dry. Listen to the first two seconds at full level. Note the key, the tempo if it is a loop, and any noise floor.
- Choose a stretch mode that matches the material from the table below. Drums need transient-aware modes, vocals need formant handling, sustained sounds handle spectral modes well.
- Set the stretch ratio or enable tempo sync so the clip length lands on an exact bar count. Turn on any auto-detected beat or warp markers, then correct them by ear against the transients.
- Audition the result at the project tempo, solo, at a normal listening level. Listen for smearing, phasiness, loss of low end and doubled or dropped attacks.
- Repair what you hear with transient shaping, a gentle limiter, or by layering a clean unstretched transient back under the stretched layer.
- Export from the DAW rather than bouncing the source player, so you get a fresh render with no extra real-time passes.
If you only remember one thing, remember step one. Stretching before the tempo is locked is the single most common reason a result gets thrown away.
How the three algorithm families behave
Before the DAW paths, it helps to know what the buttons are doing, because the same word means slightly different things in each one.
Resampling and varispeed. The file is read at a different rate. Nothing is reconstructed, so there is no phase cancellation and no smearing, but pitch moves with tempo. On a drum break, speeding it up 10 percent sounds completely natural. On a vocal it produces the chipmunk effect. Producers on r/makinghiphop often recommend resampling a break and then pitching the result back down, which trades the pitch shift for the tempo change and often lands in a better place.
Phase vocoding. The audio is transformed into a time-frequency representation, the magnitude and phase data are modified, then inverted back to a waveform. It handles polyphonic sustained material and long pads well because there are no hard transients to smear. It is the reason a stretched vocal can go thin, hollow or metallic: the phase relationship between partials is no longer coherent.
Granular overlap-add. The file is cut into overlapping grains, usually 30 to 200 milliseconds, and each grain is resampled to fit the new duration before being crossfaded into its neighbour. Because grains are short, pitch stays stable. The tradeoff is that if a transient falls in the wrong place inside a grain window, it gets spread out, which is the classic “recorded through a pillow” complaint on stretched drums.
Modern modes are hybrids. A transient-aware granular mode detects attacks, then switches to a short window around them and a long window in between, which is why it holds up better than textbook granular synthesis.
Which stretch mode to pick for your material
Use this table as the starting point. Every DAW has an equivalent setting, and the artefact column tells you exactly what to listen for.
| Material | Recommended method | Mode names to look for | Listen for |
|---|---|---|---|
| Drum loop or break | Transient-aware granular | Beats, Complex, E3 Mono, Adapt, Manual warp | Smearing or doubled kick and snare |
| Single drum hit or one-shot | Resampling or short grain | Re-Pitch, Resample, Stretch | Pitch drift if resampling a tuned hit |
| Vocal phrase | Formant-aware granular | Formant on, Tones, E3 Generic, Scale | Chipmunk squeal or Darth Vader hollow tone |
| Pad, string or guitar loop | Spectral or large-grain granular | Texture, Complex Pro, Tones | Loss of high end, wobble on long notes |
| Full mix or band recording | Spectral, small ratio only | Texture, Complex Pro, adapt | Whole mix goes soft and phasey |
| Vinyl or tape artefact sound | Resampling | Re-Pitch, Resample | Pitch change, which is the point here |
| Extreme sound design | Long-grain granular | Texture with a long grain size, PaulStretch | Nothing wrong, it is supposed to be strange |
The general rule from the forums: if a mode makes the material sound worse than doing nothing, go back to resampling for percussion or pick a spectral mode for sustained sources. Reaching for the most advanced option by default is exactly how people make things worse.
How to time stretch a sample in Ableton Live
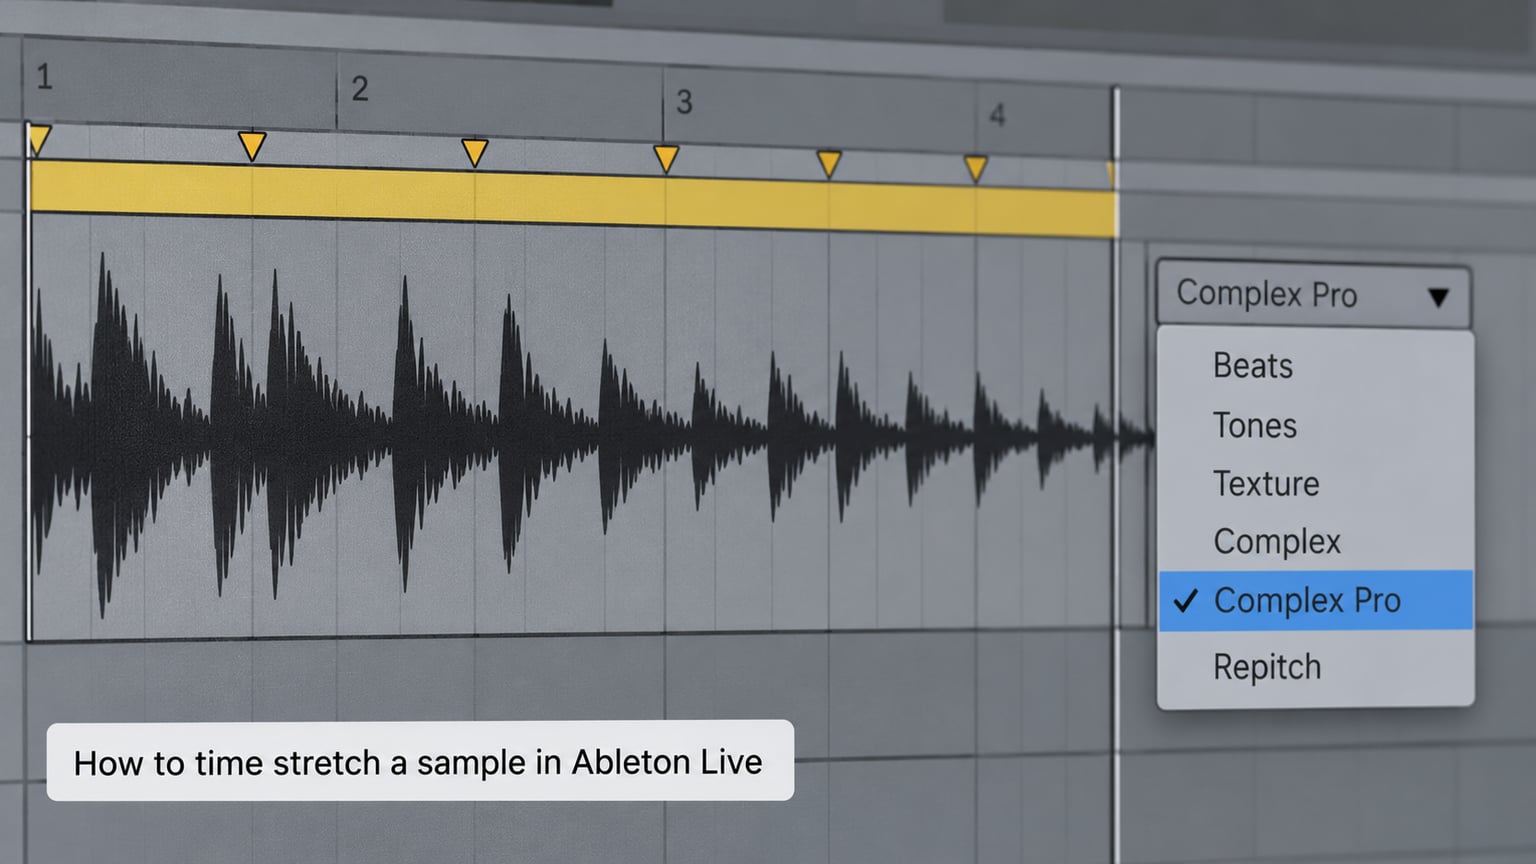
Ableton calls the feature Warp, and it is the most granular of the built-in options.
- Import the file into an Audio Track or Drum Rack. Live detects the tempo on import and switches Warp on automatically for most loops.
- Click the Warp button in the clip’s top bar to toggle it on. Warp is what allows the clip to follow the project tempo; without it the audio just plays at its original speed.
- Set the mode in the Warp Mode dropdown, which is the small square in the top-left corner of the clip. Beats for rhythmic material, Tones for pitched loops, Texture for long granular washes, Re-Pitch for the tape-speed resampling effect, Complex and Complex Pro for the highest quality multi-transient handling.
- Fix beat markers. Warp markers are the yellow flags along the top of the waveform. Drag one to sit exactly on a kick or snare. To add more, switch the tool to the Draw tool, enable the Warp button in the tool’s slot, and click along the waveform. The grey pseudo-warp markers only exist between yellow ones and cannot be moved.
- Change the ratio or lock the loop length. Drag the Warp Ratio field to stretch manually, or open the clip’s Segmentation to Loop setting to choose a fixed bar count such as 4, 8 or 16. In Live 11 and later, the Loop option with a bar count is usually the cleanest way to land an exact loop length.
Two details catch people out. If the detected tempo is double or half the real one, the markers alternate long and short, which means the guess is wrong; the Clip menu offers a doubled and halved tempo option to correct it. And on very short samples, Live adds a tail so the waveform fills the whole clip, which alters what you hear at the end. r/ableton users stretch slightly by consolidating the clip to fill the empty space, turning Warp on, then dropping a single warp marker at the end of the clip.
The shortcut people search for is Ctrl+K on Windows and Cmd+K on Mac, which opens the Clip View. That is where the Warp Mode dropdown, the Formants switch and the grain-related controls live in one place.
How to time stretch a sample in FL Studio
FL Studio has two routes, and they are not the same thing.
- Drag the file into the Playlist. Double-click the clip to open Audio Clip Properties.
- Right-click the Time knob in the channel or playlist context to get the auto-detect options, then choose a start time and a time mode. This is the route producers on r/FL_Studio mention most, and the fix that matters is step 3.
- Change the stretch algorithm. The default is Resample, which changes pitch with tempo. Switch to E3 Mono for a mono drum or bass source, or E3 Generic for anything else. That one dropdown is the difference between a usable stretch and a chipmunk vocal.
- Use the dedicated Stretch tool for precise work. Open it with the Time Tool button in the toolbar, or Alt+T inside the channel editor, or from the Tools menu under Time. Drag the right edge of the clip to set the target length, then set the Mode, Preserve pitch and Stretch ratio in the tool’s panel.
- Slice while you stretch if the source is a break. With the Stretch tool or the Slice tool (Alt+S) active, cutting and stretching work together, which is the workflow asked about on elektronauts.
FL Studio also lets you set the default algorithm for the whole project in the audio settings, so you stop forgetting to change it per clip. Do that once and the default problem mostly disappears.
How to time stretch a sample in Logic Pro
- Import the file to the Audio Track area so you get a region, not a sampler voice.
- Enable Flex Time. Select the region, then use the inspector’s Flex Time button, or the region inspector under the name. The editor shows flex markers and an anchor point.
- Choose the algorithm from the Flex Time Mode menu. Time is the basic mode, Stretch and Scale fit a region to a fixed length, and Polyphonic is the highest-quality option on complex material. The inspector also has Formant Correction for vocals.
- Set the timing mode. Under the main Flex Time area, Position preserves absolute timing, Anchor holds the anchor point, Scale scales all timings proportionally, and Transients is designed for percussive material. Scale is the usual choice for fitting a loop to a bar count.
- Drag the marker on the right-hand ruler to change the length, or use Quantize to Tempo with Musical or Absolute values.
One trick that Logic users rely on: set the project tempo temporarily to a round number like 120 so the loop end lines up with a visible bar line, note the position, set the real tempo back, then drag the marker. Finding loop end points by ear at 140 BPM is a waste of an afternoon.
Logic also has Time Machine and a dedicated Time Stretch window if you are comparing modes. Flex Time is the one you want for a beat.
MPC, Maschine, Bitwig and REAPER: the settings that matter
MPC software and hardware use Warp Mode with four choices: Keep (playback speed changes, pitch follows), Adapt (time changes, pitch is protected), Ratio (a precise stretch ratio with pitch protected), and Manual where you place markers on transients yourself. The BPM display on the waveform view tells you the detected tempo, and the halve and double buttons correct a misguess.
Maschine keeps it simple in the sampler. Load into a pad, open the sample’s parameters, and switch Stretch Mode from Pitch to Stretch or the Stretch/Stretch+ option depending on the version. For loops, enable Sync and set the sample to a fixed length. r/maschine threads asking for perfect 4-bar and 8-bar loops are answered with the same advice: set Sync, choose a bar count, then trim the sample start.
Bitwig Studio stretches inside the sample editor. Open the sample, set the target length in the inspector, and the stretch is applied in real time. The Sample module also has a Time setting, so you can render a different stretch per instance of the same sample.
REAPER exposes the most parameters. In Item Properties, the Playback section has a Time stretch mode list and a preserve-pitch checkbox, with separate pitch shift and time shift amounts. The defaults are fine for most work; the playrate and preserve-pitch pair handles small adjustments well. REAPER users regularly ask for algorithm advice and the honest answer is that Preserve pitch plus a small ratio beats the more exotic modes for everyday use.
SP-404 and Electribe can stretch too, but the workflow is different: resample a pad while the source plays at the new length, then the resampled sound becomes your new sample. It is a two-step process and it locks the sound at that moment, which is fine for pitching a hit up a fifth and useless for fine tempo matching.
Matching a sample to an exact 4-bar or 8-bar loop
This is the most repeated question on producer forums and the one most written guides skip. Here is the sequence that works.
- Set your project tempo and time signature. Odd bar counts break the assumption that most DAWs make about 4/4, so fix the signature before anything else.
- Find the real downbeat of the break. Set the file to Sync with markers on the first strong transient, then listen from a bar line. If the loop feels like it drifts, the source itself drifts; no stretch mode fixes a badly performed break.
- Set the target loop length in bars, not seconds. Ableton’s Segmentation to Loop, Logic’s Scale flex mode with a region length in bars, FL Studio’s time mode in bars, and MPC’s Manual warp all do this. Seconds-based stretching is what produces loops that are 30 milliseconds off.
- Nudge the start point so the first hit lands exactly on the downbeat, not a few milliseconds before or after it.
- Turn the grid to a fine division and zoom in on the first transient to check the alignment at sample level.
If a stretched break still does not sit right, the cause is usually drift in the original recording rather than the algorithm. Short loops drift less. For a long break with a tempo that wanders, percussive warping in Ableton or per-transient markers will hold up better than a single ratio.
How to check the result and export it
Audition the stretched clip solo, at the level you normally mix at, and check four things in order. First the transients: play along with the kick and confirm nothing is doubled or late. Then the low end, because stretched material loses weight and the level meter dropping 2 dB on the master bus is a clue. Then the phase: switch between the stretched clip and the original, and listen to the difference with mid-side or a mono check. Finally the pitch: play it over a sustained chord, and if it sounds wrong it is because the key changed, not because the stretch failed.
Export from the DAW so the render includes the stretch rather than capturing a real-time playback pass. If you are flattening to a single file, print the track after the stretch, then you can freeze the clip and stop processing it.
No DAW? Free ways to time stretch a sample
Three options cover the case where you have nothing installed. Audacity has a Change Tempo and Speed effect with a Preserve Pitch checkbox, and it is free. PaulStretch is a free extreme-stretching program that turns a short sample into a long, evolving ambient bed; it is the wrong tool for a drum break and the right tool for sound design. Online editors such as AudioMass or 123APPS let you change speed and pitch in the browser and export, with no install at all. They are fine for a one-off; for loop fitting, a DAW gives you markers and bar counts that a web editor does not.
Common Mistakes
Every one of these is avoidable, and most are the reason a stretched sample ends up unused. Here is what goes wrong and what to do instead.
Stretching before the target tempo is locked
You set the project tempo, stretch the sample to fit, then change the tempo after a collaborator asks for a different feel. The stretch recomputes and the markers are no longer on the hits.
Fix: decide the tempo first. If it does change later, use tempo-synced warping rather than a fixed ratio, so the markers hold as the tempo moves. In Ableton, leave Warp on with a Clip Tempo Follower. In Logic, keep the region synced to the project tempo rather than fixed to bars.
Using pitch shift when you needed time stretch
This is the most common confusion and it produces the classic chipmunk vocal. A pitch shift changes pitch and leaves the length alone. Many DAWs default to a resample mode that does the opposite: it changes length and pitch together.
Fix: in FL Studio, change the default from Resample to E3 Generic or E3 Mono. In Ableton, pick Tones or Complex rather than Re-Pitch. In Logic, open Flex Time and confirm Formant Correction is on for a vocal. If you specifically want the tape-speed effect, use resampling deliberately and name it in your session so you remember later.
Stretching an MP3 or a file that was already crushed
Lossy compression throws away high-frequency content in unpredictable places, and every stretch algorithm has to invent that content back. A 320 kbps MP3 of a break stretched by 12 percent will sound worse than the same break as a WAV, and the artifacts are not the algorithm’s fault.
Fix: use a WAV or AIFF, and prefer 24-bit if the source allows it. Work at the sample rate of your project, usually 44.1 or 48 kHz, so you do not run a sample through a sample-rate converter first. If that is genuinely impossible, keep the stretch small and expect less from it.
Trusting the detected BPM without checking it
Tempo detection routinely guesses double or half the real value, especially on a break with a shuffle feel or on material with no backbeat. The clip still plays at the right length, so the error is easy to miss until the loop sounds wrong against the drums.
Fix: watch the marker spacing after auto-detection. Even, short, identical gaps mean the guess is right. Alternating long and short gaps mean it is off by a factor of two, and most DAWs have a halve and double control for the detected value. Then move a few markers by ear against the strongest transients.
Raising the gain to compensate for a soft stretch
Stretched audio genuinely loses level, typically 2 to 4 dB, and turning the fader up mostly makes the loss audible as thinness. The missing energy is in the transients and the low end, not in the overall level.
Fix: add transient shaping or a short attack-focused compression after the stretch, and add a low-shelf below about 100 Hz if the weight has gone. Then set the output level to match the rest of your session, and check the meter rather than the fader position.
Pushing past the usable stretch ratio
Transient-aware granular modes hold up well within about plus or minus 10 percent, degrade noticeably by 20 percent, and fall apart past 30 percent on drums. Sustained material can go much further, sometimes to 300 percent, before it becomes unrecognisable. There is no universal limit, which is why the same file can sound perfect stretched one way and unusable the other.
Fix: check the ratio before you render, and if you need more than roughly 20 percent on percussion, resample instead. A break slowed by 30 percent with resampling is still a usable break; a break stretched by 30 percent with a phase vocoder is not. For extreme changes, build the sound from layers instead.
Ignoring the transients entirely
A stretch that treats the whole file as one continuous tone spreads each attack across a long window. The result is the soft, doubled, pillow sound described in nearly every forum thread about this problem.
Fix: choose a transient-aware mode, add markers or flex points on the attacks, and set the transient loop mode to a short value if your DAW exposes it. In Ableton, Complex or Complex Pro with transient detection is the safe default for a break.
Leaving formant preservation on for everything
Formants are the resonant shape of the vocal tract. Preserving them keeps a stretched vocal sounding human, but on percussive and instrumental material it is usually off or irrelevant. Forcing it on everywhere adds CPU cost and occasionally a slight edge.
Fix: use formant preservation for vocals, especially beyond 10 percent. Turn it off for drums, bass and instruments, or leave the setting alone where the DAW decides automatically.
Assuming time stretching clears the sample
Changing the length or pitch of a copyrighted recording does not create new copyright. The original owner still owns the underlying recording, and the rules on clearances, sample licenses and fair use do not change because the audio was processed.
Fix: clear your samples like any other material, or use royalty-free libraries with terms that permit commercial release. Time stretching a break to hide it is not a licence.
One more worth naming: stacking shifts. Bouncing a stretched clip, then stretching the bounce again, and again, multiplies the artifacts each pass. Track your ratios in the session name or a text file, and keep the unstretched source on a disabled track so you can always go back.
Frequently Asked Questions
Does time stretching change the pitch of the sample?
No, that is the whole point of a time stretch. It changes the duration of the audio while keeping the pitch and the key identical, so a break recorded at 92 BPM can sit inside a 140 BPM beat. Pitch shifting is the separate operation that moves pitch and leaves the length alone. The confusion comes from resampling, which does both at once, and from DAWs that default to a resample mode. Check that your stretch mode is set to an elastic or spectral algorithm rather than resample or Re-Pitch.
Which stretch mode is best for vocals?
Use a mode with formant preservation enabled and choose the one tuned for pitched material rather than percussion. In Ableton that is Tones or Complex with Formants switched on, in FL Studio it is E3 Generic rather than E3 Mono or Resample, and in Logic it is Flex Time with Formant Correction active. Voices stretch a long way without sounding unnatural because formants are preserved, but consonants and plosives can still smear, so transients-heavy phrasing needs markers or flex points.
How much can a sample be time stretched before it sounds bad?
It depends entirely on the material and the algorithm. Transient-aware granular modes handle roughly plus or minus 10 percent cleanly on drums, start degrading around 20 percent, and sound wrong beyond 30 percent. Sustained material such as pads, strings and drones can be stretched to several times their original length with a spectral mode and remain usable. Percussive material is the limit. If you need more than about 20 percent on a break, resampling will usually sound better than any stretch mode.
Why does my time-stretched sample sound metallic or phasey?
Metallic ringing and hollow, phasey tone almost always point to the wrong algorithm family. A phase vocoder rebuilds the signal from frequency and phase components, and when those components lose coherence the result has that characteristic metallic edge. The fixes are to switch to a transient-aware granular mode, raise the grain size if your DAW exposes it, and check that you are not stretching an MP3. If the artifact disappears at 5 percent and grows with the ratio, the algorithm is wrong for the source rather than the ratio being extreme.
Are MP3s fine to time stretch?
They work, but you get noticeably worse results. Lossy compression discards high-frequency detail in irregular places, and a stretch algorithm has to reconstruct that detail, so the artifacts get worse as the stretch ratio grows. A 320 kbps MP3 can be acceptable for a small adjustment under about 5 percent. For anything larger, find or export the WAV or AIFF, and work at your project sample rate so the file is not converted on the way in.
Can I time stretch a sample without a DAW?
Yes. Audacity is free and has a Change Tempo and Speed effect with a Preserve Pitch checkbox, which handles most tempo matching. PaulStretch is free and designed for extreme stretching, turning a one-second sound into a long evolving bed, so it suits sound design rather than loop fitting. Several free browser editors let you change speed and pitch online and export without installing anything. All three are fine for one-offs, but none of them gives you markers or a bar-count setting for fitting an exact loop length.
Conclusion
Start with the tempo. Set it, commit to it, and only then touch the sample, because every stretch ratio you calculate before that decision is thrown away the moment the tempo moves.
After that, the whole job is choosing correctly. Drums want a transient-aware granular mode, vocals want formant preservation, sustained sounds want a spectral or large-grain mode, and anything you need to move more than about 20 percent wants resampling instead of stretching. Check the markers against the real transients, audition the result solo at your normal volume, and only then export.
Most stretched samples that get thrown away were never a lost cause. They were a wrong mode on a good file.